
When winter temperatures plunge below freezing point, one of the most common household emergencies homeowners face is a frozen pipe. Not only does it disrupt water flow, but it also poses a serious risk of bursting — potentially causing extensive water damage to your home. Fortunately, with prompt action and the right approach, you can repair a frozen pipe and prevent major water damage.
In this comprehensive guide, we’ll walk you through how to identify, thaw, and repair a frozen pipe safely. Plus, we’ll explain when it’s best to call professionals like Insight Restoration, a premier water damage restoration company known for restoring homes quickly and effectively after water-related disasters.
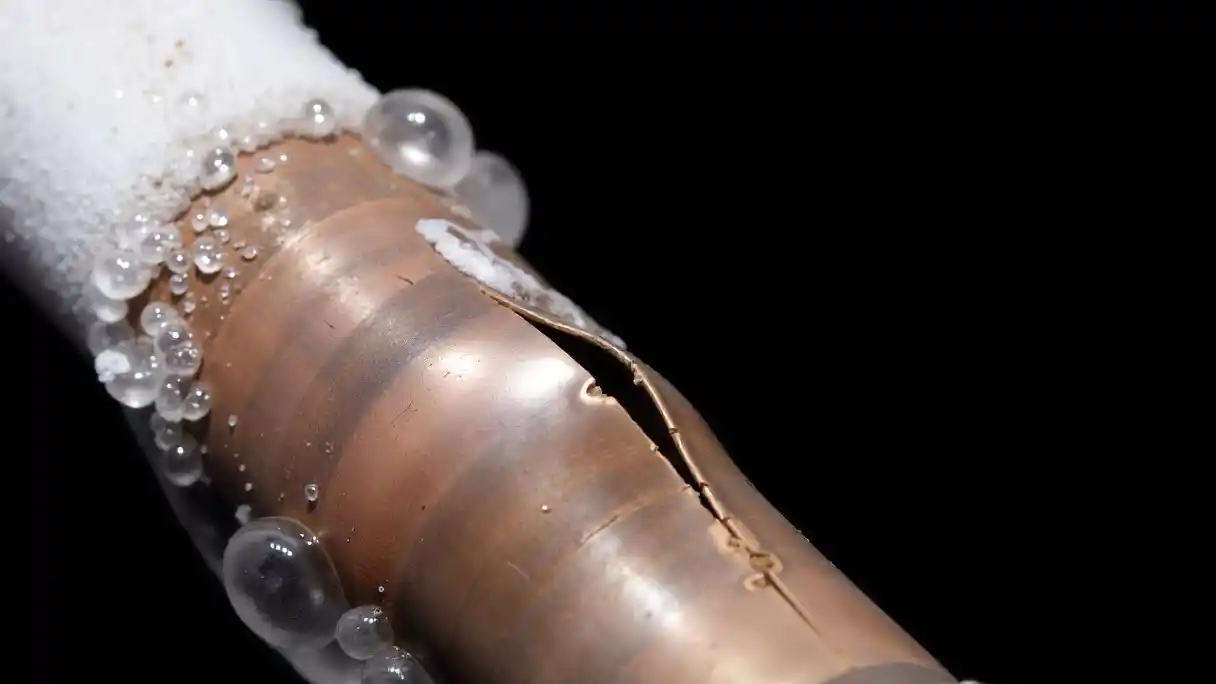
Understanding Why Pipes Freeze
Pipes freeze when the water inside them drops below 32°F (0°C). As the water turns to ice, it expands, creating pressure inside the pipe. This pressure can cause cracks or even full ruptures, especially in uninsulated or exposed areas such as:
- Attics and basements
- Crawl spaces
- Exterior walls
- Garages and outdoor plumbing
Even a small crack in a frozen pipe can release gallons of water once it thaws, leading to serious flooding and structural damage. That’s why prevention and quick repair are crucial.
Step 1: Identify the Frozen Section
The first sign of a frozen pipe is usually reduced or no water flow from a faucet. To locate the frozen area:
- Turn on all faucets — If only one area has low water pressure, the frozen pipe is likely nearby.
- Inspect exposed pipes — Look for frost accumulation, bulging sections, or condensation.
- Check colder zones — Pipes running through exterior walls, basements, and attics are the most vulnerable.
If you can’t easily access the frozen section, it’s best to stop here and call a professional plumber or a water damage specialist like Insight Restoration to assess the situation safely.
Step 2: Shut Off the Main Water Supply
Before attempting to thaw or repair a frozen pipe, shut off the main water valve. This step prevents flooding in case the pipe bursts during the thawing process.
After shutting off the water:
- Open all faucets to relieve any built-up pressure.
- If you suspect a burst has already occurred, also turn off the electricity in affected areas to avoid electrical hazards.
Step 3: Safely Thaw the Frozen Pipe
Never use an open flame, such as a blowtorch, to thaw a pipe — it can cause fire hazards and damage the plumbing. Instead, use gentle and controlled heat. Here are safe methods:
- Hair Dryer or Heat Gun: Direct warm air along the pipe, starting from the faucet end and working backward toward the frozen section.
- Heating Pads or Hot Towels: Wrap the frozen area with a heating pad or towels soaked in hot water.
- Space Heater: Place a space heater in the room (not directly against the pipe) to gradually raise the temperature.
As you thaw, check for leaks — if you see water dripping or spraying, immediately turn the water off again and contact a professional.
Step 4: Inspect for Damage and Leaks
Once the pipe is fully thawed, slowly turn the water supply back on and observe:
- Do you hear any hissing or dripping?
- Is water pressure normal?
- Are there visible cracks or damp spots along walls or ceilings?
Even small leaks can lead to hidden water damage inside walls, floors, or insulation. If you find any moisture, don’t ignore it — lingering dampness can lead to mold growth and structural issues. This is where Insight Restoration can step in to help.
Step 5: Repairing the Pipe
If you’ve confirmed a leak or crack, here are your options:
Temporary Fixes
- Pipe Repair Clamp or Tape: Use a repair clamp or waterproof tape to cover minor leaks.
- Epoxy Putty: For small cracks, mold epoxy putty around the damaged section.
These are short-term solutions. For a lasting fix, you’ll need to replace the damaged section of the pipe, ideally handled by a licensed plumber.
Step 6: Addressing Water Damage
If a frozen pipe has burst and caused flooding, immediate water mitigation is crucial. Standing water can quickly soak into drywall, flooring, and furniture — creating the perfect conditions for mold.
That’s when you should call Insight Restoration, a premier water damage restoration company. Their expert team can:
- Extract standing water using advanced drying equipment
- Inspect for hidden moisture behind walls and under floors
- Repair damaged structures and materials
- Prevent mold growth and restore indoor air quality
With 24/7 emergency response and industry-certified professionals, Insight Restoration ensures your home is safe, dry, and restored to its pre-damage condition as quickly as possible.
Step 7: Prevent Future Freezing
Once your pipes are repaired, take steps to ensure it doesn’t happen again:
- Insulate pipes in crawl spaces, basements, and attics.
- Seal air leaks near pipes to keep out cold drafts.
- Let faucets drip slightly during extreme cold to keep water moving.
- Keep heat consistent — don’t lower your thermostat below 55°F (13°C) even when away.
- Drain outdoor hoses and shut off exterior water lines before winter.
Preventive maintenance is always easier — and cheaper — than repairing water damage after the fact.
Final Thoughts
Dealing with a frozen pipe can be stressful, but quick action can prevent a small problem from turning into a major disaster. Remember:
- Locate and thaw the pipe safely.
- Check for leaks and structural damage.
- Call professionals if water damage has occurred.
If you’re facing flooding or need help restoring your property after a burst pipe, Insight Restoration is your trusted partner. Their team combines advanced technology with years of experience to restore your home quickly, safely, and efficiently — so you can get back to normal life faster.
FAQ
1. How can I tell if my pipes are frozen?
You’ll usually notice a significant drop in water pressure or no water coming from your faucets. Other signs include frost on exposed pipes, strange clanking sounds, or bulging pipe sections. If you suspect a frozen pipe, act quickly before it bursts.
2. What should I do first if I find a frozen pipe?
Immediately turn off the main water supply to prevent flooding if the pipe bursts during thawing. Then, open nearby faucets to relieve pressure and start carefully warming the frozen section using a hair dryer, heating pad, or warm towels.
3. Can I use a blowtorch or open flame to thaw frozen pipes?
No! Using an open flame is extremely dangerous. It can ignite nearby materials or damage the pipe, leading to leaks or fire hazards. Stick to safe heating methods like space heaters, hair dryers, or heat lamps.
4. How long does it take to thaw a frozen pipe?
Depending on the pipe’s length, thickness, and location, it may take 30 minutes to several hours to thaw completely. Be patient and apply heat evenly along the pipe. Rushing the process can cause cracking or bursting.
5. What should I do if a frozen pipe bursts?
Shut off your home’s main water valve right away, and cut power to any affected areas. Then, call Insight Restoration or a licensed plumber for emergency assistance. Insight Restoration’s team can extract water, dry your property, and repair any water damage before it worsens.
6. How can I prevent my pipes from freezing in the future?
Insulate exposed pipes, especially in attics, basements, and crawl spaces. Seal air leaks near plumbing, keep your home’s heat consistent, and let faucets drip slightly during extreme cold to keep water moving. Don’t forget to drain outdoor hoses before winter.
7. Are frozen pipes covered by homeowners insurance?
In many cases, yes—if the freezing and resulting damage were sudden and accidental. However, if the insurer determines you didn’t take reasonable preventive measures (like insulation), coverage might be denied. Document everything and call Insight Restoration — they can assist with the restoration process and help coordinate with insurance adjusters.
8. How much damage can a burst pipe cause?
Even a small crack in a pipe can release hundreds of gallons of water in a day, leading to flooded floors, ruined drywall, and mold growth. Quick mitigation by professionals like Insight Restoration can dramatically reduce repair costs and prevent long-term structural issues.
9. Can I repair a frozen pipe myself?
If the pipe isn’t cracked, you can attempt safe thawing. However, if you find any leaks, swelling, or cracks, it’s best to call a plumber or Insight Restoration immediately. DIY repairs are temporary — professional restoration ensures your home remains safe and dry.
10. When should I call Insight Restoration for help?
Call Insight Restoration as soon as you suspect water damage, flooding, or mold caused by a frozen or burst pipe. Their certified technicians are available 24/7 to handle emergency water extraction, structural drying, and full restoration — bringing your home back to pre-loss condition quickly and efficiently.